
Automated customer care
Automatic customer service is a feature of Nobi Pro that supports online retailers in setting up automated processes to execute customer care marketing campaigns. To use the automatic customer service feature, access Nobi Auto -> Automated Customer Care
The screen will display as shown below.

1. Overview introduction
1.1. Overview data
(1) Total Number of Process: The total number of processes created in the system
(2) Active: The total number of processes that are currently active in the system
(3) Inactive: The total number of processes that are inactive in the system

1.2. Automated Process List
List of automated processes displayed from oldest to newest, you are allowed to operate:
(1) Search: Search by automated process name
(2) Filter by process group: Filter automated processes by type
(3) Filter by Staff in charge: Filter automated processes by creator
(4) Created Date: Filter processes by creation time

(5) Change Status: Update the process to reflect its active or inactive state.
(6) Delete: Remove the process from the system.
(7) View Process Details: Click on each process to see the detailed setup

1. Add new process
To add a new automated customer service process, please follow these steps:
(1) Click "Add new process" to display the process addition form
(2) Enter the process name information
(3) Select the process group. You can set up your own process group following the instructions: HERE
(4) Click "Next"

Next, you need to add initial conditions to the process.
(1) Click on the (+) -> Click "Add Initial Condition"
(2) The condition addition form displays -> Select "Condition Type"
Based on action: When you execute an action that corresponds to the conditions of the campaign, the system will carry out the tasks set up according to the tasks within that campaign.
Time-based: The system will automatically execute tasks for a campaign according to the schedule set by the user for the respective campaign.

1.1. By the time
If you opt for a time-based condition, you need to set a specific send date and time or trigger the send based on an event.
One-time communication: Send a message to the customer once, counting from the event occurrence.
Set up a recurring schedule: You need to establish the frequency of dispatch, specifying the number of years between each send-out and the total number of iterations.

You can choose to set up a customer birthday event or an employee birthday event
Configure the timing for sending out messages

After setting up the initial conditions, click the "Save" button. At this point, you will proceed to create a task for sending messages.
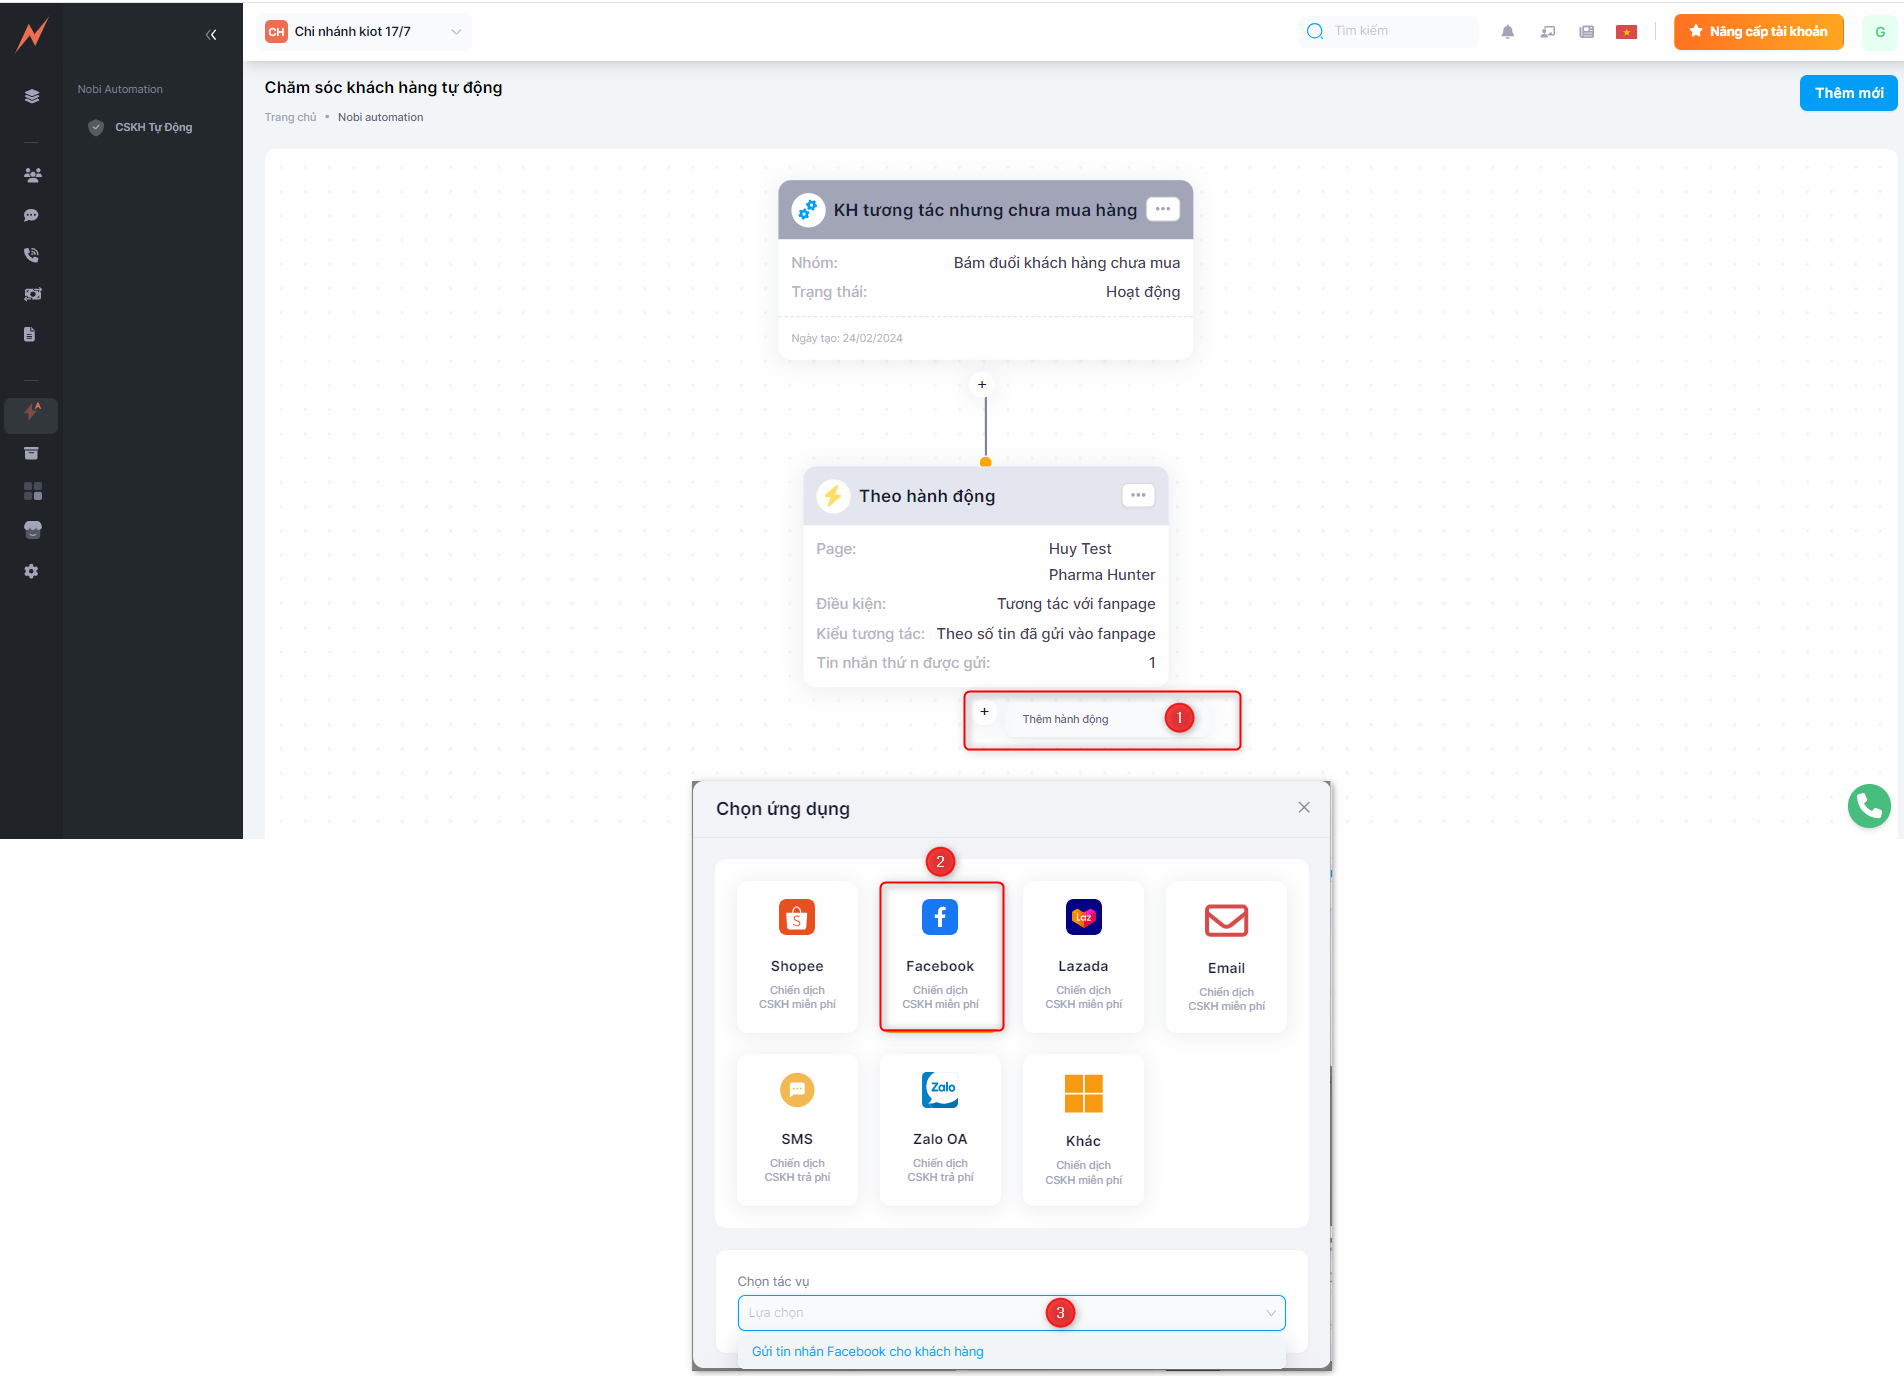
(1) Click (+) -> Add Action
(2) Select the application you wish to use for messaging. For instance, in the image below, choose to send a message to the customer via the Facebook app
(3) Select the messaging task


After selecting the Facebook messaging task, the screen will display as follows, and you will need to set up conditions for the process to function.
(1) Sending Page: Select the fanpage that will send the message. If left blank, the system will automatically determine the relevant conditions.
(2) Message Type: Choose the type of message to send that complies with Facebook's regulations.
Standard 24h Messaging: This message is sent within 24 hours from the time a person interacts with your business. The message can be promotional or standard.
7-Day Response Messaging: This message is sent within 7 days from the time a person interacts with your business. The content must be relevant to the inquiries that the customer is discussing.
Order Update Notifications: These messages are used to inform customers about the status of their orders and shipping details. They can be sent beyond the 24-hour window. These messages must not contain advertisements, marketing, or cross-selling.
Event Reminder Messages: These messages are used to remind and inform customers about an event they have registered for. They can be sent beyond the 24-hour window. These messages must not include advertisements, marketing, or sales promotions.
(3) Scheduled Send Time: The message will be automatically sent to the customer at the designated time.
Immediate: The message will be sent as soon as the initial conditions are met
After a period of time: The message will be dispatched after the set time period if the initial conditions are satisfied.
(4) Campaign object: Establish the customer segments to whom messages will be sent.
Customer Selection: Automatically identify relevant customers who meet the initial criteria of the selected pages.
Select by Customer Name: Choose the customer name to whom you want to send a message.
Additionally, you can also select the gender of the customer, exclude certain customer groups, or combine various customer filtering conditions to create the most detailed customer file.
(5) Campaign Content: Set up the message content to be sent to customers, with the ability to insert dynamic data and attach files for messaging.
(6) Save: Save the created settings.
After setting up the workflow as described, the screen will display the details of the process you have created. Click "Add" to save the procedure.
1.2. By the actions
For the process automation -> by action, the steps to create an automated process are as follows:
In this content, Nobi Pro will guide you through setting up a workflow based on actions, sending messages to customers on the condition that they have interacted with the Fanpage.
(1) Select condition type: Based on action
(2) Select condition: Interacted with Fanpage (Customer has interacted with the fanpage)
Select page: Choose the Fanpage you want to automate processes for. (If left blank, all fanpages will be set to default)
(4) Choose the interaction type: Select the type of interaction that the customer has engaged in.
Based on the number of messages sent to the fanpage: Set up the nth message the customer has sent to the fanpage.
First message in a time period: Select the time period for the first message a customer sends to the page, counting from the moment the process is created.
Reply to system message: Choose the campaign that has been sent to the customer. When the customer responds to that campaign message, the automation process will be initiated.
(5) Save: Save the created settings.
After saving the above conditions, you need to select an app to send messages.
(1) Click (+) -> Add Action
(2) Choose a messaging app
(3) Select a task
**Note: In this content, we guide you through setting up a task to send messages to customers on the condition that they have interacted with the fanpage.
For the task of sending messages to customers, the process of setting up the sending conditions and the content to be sent is similar to the automated process over time -> Facebook messaging task.
After setting up, click "Add" and the system will save the process you just created in the automated workflow management screen.
3. Update the automated process
To update the automated process, click on the campaign you wish to modify -> At this point, the setup steps screen will be displayed.
To update the process name, conditions, or actions, please follow these steps:
(1) Click on the three dots corresponding to each display
(2) Select "Edit"
(3) Update the relevant information for the screen you have chosen
(4) After updating, press the "Save" button to save the settings of the screen you have just edited.
(5) Continue by clicking "Save" at the screen for all steps -> At this point, the system will automatically display the management screen for the list of processes.

In some instances where you don't wish to update existing data fields but prefer to delete them to create new data, you can click on the corresponding three dots next to the condition -> Click "Delete"

**Note:
If a procedure currently has all the necessary conditions and tasks, you are only allowed to delete the task for sending notifications first, and then you may remove the initial condition modal.
It is not permitted to delete the modal with the procedure name.
4. Change status
If the current process is Active, you can change the status to Inactive, or vice versa, with a simple operation as follows:
(1) Click on the three dots to the right of the process
(2) Click "change status"
The display changes its status.
(3) Select status
(4) Click "Update"

5. Delete process
To remove an automated process, please follow these steps.
(1) Click on the three dots to the right of the process
(2) Click Delete -> A confirmation popup to delete is displayed
(3) Click Delete

Last updated